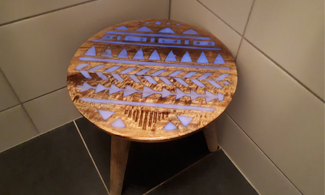
Everyone loves the Glow in the Dark effect, but did you know you can make it yourself with epoxy and Glow in the Dark pigment powder? In this article we explain step by step how to make a Glow in the Dark table and what you need for it. The idea is to fill a notch table with Glow in the Dark epoxy to create a very nice effect. Of course you can also apply it in other ways, just be as creative as possible!
Watch how Creachick makes a Glow in the Dark table in the video below:
The first step is to buy a nice table at a home or hardware store. It is important that it has notches so that you can fill them. It may of course also be a different type of table or product, but we use a table with notches because this gives a nice effect. Also make sure that you bring the most beautiful table, the wood remains visible and is therefore an important part of your table.
Once you have chosen a table, you need to make some preparations. Make sure that the table is level and that you cover the area well to prevent any drips! Use cover foil or a garbage bag for this, as epoxy does not adhere to this.
It is now time to prepare the epoxy casting resin and add approximately 15% Glow in the Dark powder. Make sure you follow the mixing ratio on the packaging, for MasterCast 1-2-1 Resin this is 100:90 by weight. Mix the epoxy and hardener thoroughly for three minutes before adding the Glow in the Dark powder. Mix this again for 3 minutes so that you get an even mass. When mixing, always scrape the bottom and sides of the mixing bowl thoroughly.
Do you use multiple colors of Glow in the Dark powder for your table? Then make sure you have several mixing cups. You prepare the entire casting resin in one mixing cup and divide it among the other mixing cups. You add the powder to this so that you have different colors to use for your table.
TIP:the mixing ratio of MasterCast 1-2-1 Resin is 100:90 by weight.
After mixing, you can start pouring the Glow in the Dark epoxy into the indentations of your table. Do this carefully with, for example, a mixing spatula or small spoon so that you spill as little as possible. This will save you sanding later. Pour a small amount at a time and spread it over the indentation. If it is too little, you can always add some more and distribute it again.
Allow the Glow in the Dark epoxy to cure for 24 hours before moving on to the next step. This ensures that the epoxy is at the desired hardness.
Did you spill epoxy while pouring the notches? You can then sand this away with 80-120 grit sandpaper until your table is nice and smooth again. After this you can continue with the next step and slowly finish your table.
Before you pour epoxy, double check that your table is level and that you have covered the area properly. Also make sure you cover the legs and bottom properly. For example, you can cover the bottom with tape, epoxy does not adhere to it and you can cut the tape away the next day.
Now prepare approximately 300 to 400 grams of MasterCast 1-2-1 Resin (this is for a small table). Pour the epoxy over the table and spread it evenly so that the entire table is poured. If necessary, you can remove the air bubbles with a gas burner. Make sure that you do not hold the gas burner too close to the epoxy and that you always do this in a sweeping motion, otherwise you run the risk of discolouring the resin.
Now let the table harden for another 24 hours before removing the tape from the underside and touching the epoxy. The epoxy will continue to harden over the next few days.


Here you can find all 9 related articles on this topic. Mis je informatie om aan de slag te gaan met jouw klus? Neem dan contact met ons op.
Do you have a specific question? Call one of our specialists for free advice +3185 0220090
