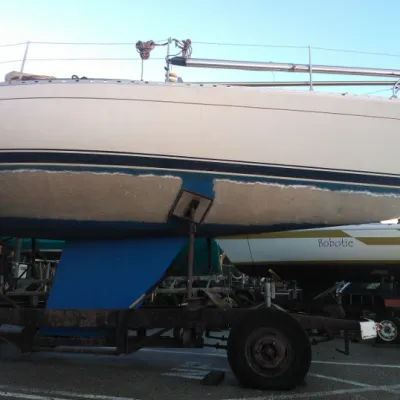
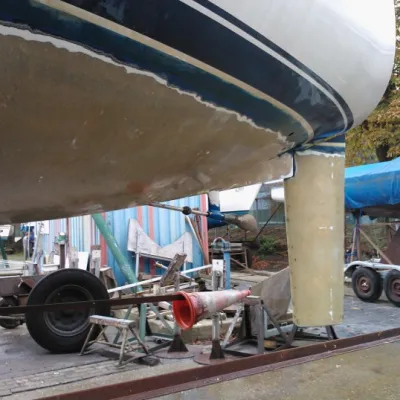
Osmosis is a nasty phenomenon and the terror for many boat owners. Unfortunately, osmosis is inevitable, but fortunately you can prevent or remedy it yourself. In this article we explain all about recognizing osmosis and show you step by step what you can do to stop osmosis on your polyester boat!
Osmosis is a physical reaction that occurs on polyester boats when water penetrates the gelcoat and reacts with chemicals. Water will slowly penetrate the gelcoat and, over time, get stuck in a cavity. This is where a chemical reaction occurs, causing the cavity to enlarge and create a blister. Eventually, the blister will burst, creating a crack and causing the underlying laminate to soak up water.
Severe osmosis formation in your boat's laminate can eventually cause delamination, which reduces the strength of the hull. When you treat osmosis on time, you maintain the strength of the boat and osmosis treatment is easier.
You can recognise osmosis by the appearance of blisters (thickening) in the gelcoat. If you carefully open these blisters, moisture is released with a sour, vinegar-like odour. The size of the blisters can vary and as long as they remain small, there is not much to worry about. When the blisters become larger (between 5 mm and 50 mm), osmosis becomes a bigger problem. In structural osmosis, the polyester laminate is affected, revealing loose glass fibres. In this case, it is important to start treating the osmosis immediately. If neglected, it can lead to delamination in which entire layers of polyester come off.
Prevention is better than cure and we therefore recommend regularly checking both old and new boats for osmosis. That way, you can catch it early and treat osmosis in time.
Have you detected structural osmosis on your boat? Then take immediate action. You can fortunately perform an osmosis treatment yourself using the step-by-step plan below.
Commodities
Tools
The first step of the osmosis treatment process is to remove the gelcoat layer. This can be a tedious job, but once you have done this, the worst is behind you. You can remove the gelcoat in several ways. You can remove it with a Gelplane vacuum scraper or, for example, an angle grinder with a flap disc. Gelcoat removal is even faster with the professional Tercoo rotating blaster with adjustable guide and dust cover.
Don't feel like doing this job yourself? You can also hire a company to remove gelcoat on site.
When you have removed all the gelcoat, it is important to regularly clean the surface of the bare laminate with clean water and to let the laminate dry for at least a few weeks, for example throughout the winter. It is not a problem if the ship remains slightly damp, but the drier the better.


When the laminate has dried sufficiently, you can fair the hull with International Watertite epoxy putty. Watertite is extremely water-resistant and is easy to apply due to its 1:1 mix ratio. You can also use homemade filler made of fast epoxy resin combined with red microballoons. Read more about fairing the boat's hull here.
Now clean and degrease the surface well with acetone or BioSafe (a environmentally friendly degreaser) before continuing.
After filling, cleaning and degreasing, it is time to apply two layers of twill fabric with universal epoxy. Epoxy from Polyestershoppen.com does not contain any solvents and is therefore completely vapour-tight when processed properly. Apply the fabric with several people. Someone cuts the fabric and applies it to the boat, someone else rolls epoxy over the hull, for example.
After you have cut the fabric to size, epoxy resin can be applied to the entire hull. This can be done with a velour roller. Always wear nitrile gloves when processing epoxy. After applying the resin, the fabric can be applied to the boat hull. Then roll epoxy over the surface and de-aerate the laminate with a de-aeration roller. You can overlap the pieces of glass fabric by about 2 cm. Work from back to front so that the overlap is in the most common sailing direction.
When you have laminated the entire hull, we recommend covering the surface with a layer of peelply. This tear-off fabric prevents a wax layer from forming on the epoxy and you needn't sand the boat when you are going to apply the coating. If you continue after 24 hours of curing, you can easily pull the tear-off fabric (peelply) off again.
See how we laminated the boat hull with glass fabric in the video below.
After the epoxy is fully cured, remove the tear-off fabric and sand the overlaps with 80 grit sandpaper. Prick open any blisters and seal them with epoxy filler.
You will now apply two layers of epoxy coating. If you wait no longer than 48 hours after the first layer, you can apply the next layer without sanding. Before you begin, clean the entire hull with acetone. Roll the epoxy coating onto the boat with a velour roller and always wear nitrile gloves. By applying the epoxy you seal the underlying polyester laminate well and it won't let water through. Your polyester laminate is now 'safe' and osmosis resistant again.
Now that your boat is osmosis free again, it is important to apply an antifouling coating to the underwater hull. Read more about the different types of antifouling in our information article: All about antifouling.
Do you still have questions about osmosis or how to prevent it? Feel free to contact our specialists.
You can calculate the surface area in the following way:
Here you can find all 37 related articles on this topic. Mis je informatie om aan de slag te gaan met jouw klus? Neem dan contact met ons op.
Do you have a specific question? Call one of our specialists for free advice +3185 0220090
